Remember, Amelia is the Impldoll and Regina is the Resinsoul. Amelia is the conservative older sister and Regina is a bit wilder.
Both dolls now have swimsuits. I 'owe' Amelia a nightgown, which I will make from a draft of an evening gown pattern.
And I will make both dolls Halloween costumes: a gypsy for Regina (another partial evening gown draft) and a cowgirl for Amelia (checking a collared shirt draft).
I love evening gowns, so Amelia will have a 30s era gown in silk and lame (the "real" version of her nightgown). The fabric for this has shipped.
Also on order is some wonderful fake rabbit fur that I will try to make a faux fur coat for Amelia and a stole for Regina (Regina might get a fox stole instead if I like the swatch I also have on order).
I have a simple skirt and blouse drafted and cut out for Regina, and need to cut out a suit for Amelia. Both of these are early 1940s.
In the future, more evening gowns! Amelia with a 20s era evening gown in olive microsuede (standing in for velvet), and Regina a dramatic 50s era evening gown out of taffeta.
Amelia is one ahead in this list, so I must think of something else for Regina. Oh, I know! Combination step-throughs, since the tap pants seem to have become Amelia's.
Also on the list are more underwear (slips and so on), jewelry, and of course furniture.
I've stained, lined the drawers, and painted the knobs of two dressers. I plan on finding some 3/4" wide trim so I can disguise the legs of one when I stack them. I've also sawn the boards for the bunkbeds, but decided to save drilling, screwing, and glueing for another day.
Wednesday, September 19, 2012

Tuesday, September 18, 2012
Review: draped swim suit and cover up
Draped swim suit and cover up #36, Hello Dolly Boutique patterns (c)2012 as sized for the 22" American Model doll
This pattern is for a bra-style top with a shaped bottom edges, swim trunks, and two coverup skirts, one short and one long. A simple pattern for a hat is also included.
I have altered this pattern to fit my 22" ball jointed doll by Impldoll.
Measurements in centimeters
This pattern is for a bra-style top with a shaped bottom edges, swim trunks, and two coverup skirts, one short and one long. A simple pattern for a hat is also included.
I have altered this pattern to fit my 22" ball jointed doll by Impldoll.
Diff Impldoll Model American Model 22"
0 Height 56 56
-1.5 Bust 23.5 25
-1 Head circumference 21 22
+1 Waist 16.5 15.5
-3.5 Neck circumference 8.5 12
-0.7 Hip 24.5 25.2
0 Shoulder width 11.5 11.5
-2.5 Arm length 16 18.5
The pattern pieces, drafted down by hand from a vintage pattern, have grainlines marked, and a few notches. Seam allowances are included.
The instructions are bullet point style, with some small reproductions of vintage pattern instruction drawings. There are some typos, misspellings, and wrong words in the instructions which might present a few problems for some less fluent English-language readers.
 My changes to the garment: Aside from altering it extensively to fit my Impldoll, I eliminated the front darts on the trunk, lined the trunks, added a band to the center front of the top, shortened the short overskirt, and did not line the overskirt. I also changed how I constructed and inserted the ties on the short overskirt.
I did not make the long overskirt or the hat.
In general, I believe that this pattern is oversized for the doll it was drafted for. However, if you check the fit as you go, this is easily corrected.
Trunks:
The trunks have three pattern pieces, front, back, and waistband. They are unlined. I lined them.
The pattern description, as provided by HDB, states "...trunks have a cute front skirt, or just plain trunks." There is no pattern piece for a "front skirt" nor is it ever described in the pattern instructions.
I believe it would be possible to incorporate the draped front section of the short coverup into the construction of the trunks if desired. It would be necessary to shorten the front skirt a bit for this use and narrow it to match the front trunk pattern piece.
The front darts are wide for their length, leading to a bubble-belly effect. I would suggest replacing each wide dart with two parallel narrower darts. Or, for a flat-stomached doll like the Impldoll Model, eliminate the front darts altogether.
I lined the trunks, since the cotton voile I used is sheer enough I found seeing the doll's jointed thighs distracting.
Short coverup:
This is a simple wrap skirt, with five pattern pieces: a back cut on the fold, a front piece, a second front piece with draping, a waistband (shared with the trunk pattern pieces), and the ties (shared with the other coverup pattern pieces).
In general, this skirt comes out too big around to tie snugly around the doll's waist, even too large for my doll (larger waist then the American Model). Also, the lack of pattern notches and the disconnect between the written pattern instructions and the included drawings is a little confusing.
The front pattern piece is asymmetrical and, along with no notches, it is unclear which edge of the asym front piece should be sewn to the back of the skirt. Careful examination of the illustrations provided indicates the skirt should close right over left. I goofed and mine closes backwards.
Also, the lefthand edge of the front pattern pieces (as viewed from the printed side) matches best in length with the back pattern piece. Taking all this into account, it is necessary to cut the draped pattern piece face down on the right side of the fabric, and the other front piece face up on the right side of the fabric. The back piece and waistband do not matter since they are symmetrical. If your fabric has no right and wrong side, ignore all that.
The pattern piece for the ties has one end angled. The directions confusingly refer to the "curved end" and direct you to fold the waistband in half, sew it, and turn it. This won't work with one angled end.
The illustration shows the ties with turned under edges, which matches the intention of the original pattern, yielding a wider, less stiff tie.
In addition to the construction of the ties, the illustrations show that the ties were to be integrated into the waistband, rather than sewn into the seam allowance below the waistband as the written directions would have. The waistband/tie illustration also answers the puzzle of the far-too-short waistband piece. Inserting the ties into the waistband, rather than sewing them in the seam below the waistband, requires a two-piece waistband.
 |
| Left hand of pic: tie inserted at end of waistband. Right hand of pic: two-piece waistband and inserted tie |
 |
| Tie inserted between the two waistband sections |
 |
| Two-part waistband stitched together on the inside of the waist |
The top was straightforward to construct with three pattern pieces: front, back, and straps, all cut twice. I chose to attach the shoulder straps separately, rather than incorporating them into the lining/fabric seam. I added a band to enclose the gathering at the center front to cover up my messy stitching there.


Thursday, September 13, 2012
What I did Today

I sueded my Resinsoul's joints (hot glue this time). Way better than moleskin.
She poses really well now. Her arms stay pretty much where I put them. No more facepalms.
She looks up

and down


Before that, I finally got my first (lousy) attempt at whole-body-blushing removed from her and still more Mr. Super Coat dispersed into the air (and on the doll) and a second and better (but not perfect) blushing job sealed with more, yes, Mr. Super Coat.

She has light pink finger and toe nails.
The Impldoll has the beginnings of new lips. I may decide that these are too pink, and I think some darker watercolor pencil might tone them down. This is "berry red" and "titanium white" acrylic paint mixed together. I also used extender medium. Made things so much easier!

I also painted two coats on the drawer knobs. I need a light sanding, a third coat, then blue decoration. I am going for the appearance of white porcelain knobs with blue decorations.
I picked up some enlongated bone beads to finish the doll purse handle.
I will hot-glue suede the Impldoll's ankle joints and see if I can get her to stand on one foot. The RS still won't stand on one foot, but she comes closer.
And......
for the future.....
I have this spare head floating around. (The original head from the Resinsoul Dai). Which I have been told makes a fair boy.

Sunday, September 9, 2012
Hanging stuff up
Now, I'm sure there is somewhere out there where one can buy dollieh coathangers, but that would deprive me of ANothER project!
make a jig
 This is two scraps of 2" x 4", screwed together because I couldn't find a long enough piece.
Three holes drilled out with a 1/2" spade bit and an old fashioned brace drill 'cause that's how I roll.
I drilled a pilot hole for the finishing nail in the middle. It would be easier if I had made the nail removable like I did the pieces of dowel.
Get some 16 gauge stainless steel craft wire and some cutters
 and pliers


and ...
Ta Da!

And Double Ta Da!

Pulling the wire as tight as you can is good and a bench vise or some other way to hold the jig still is useful.
My hangers a suitable for 1/3 scale, and take about 14.5" of wire a piece.
There is some floral wire out there (at Joanns or other craft places) that is about the same thickness but much softer. It is easier to bend, but is easily distorted also.
This project brought to you by the number 93, which is how old my dad would be this year had he lived longer. He made me my first (barbie) coathangers this very same way a long time ago.
make a jig

Three holes drilled out with a 1/2" spade bit and an old fashioned brace drill 'cause that's how I roll.
I drilled a pilot hole for the finishing nail in the middle. It would be easier if I had made the nail removable like I did the pieces of dowel.
Get some 16 gauge stainless steel craft wire and some cutters


and ...
Ta Da!

And Double Ta Da!

Pulling the wire as tight as you can is good and a bench vise or some other way to hold the jig still is useful.
My hangers a suitable for 1/3 scale, and take about 14.5" of wire a piece.
There is some floral wire out there (at Joanns or other craft places) that is about the same thickness but much softer. It is easier to bend, but is easily distorted also.
This project brought to you by the number 93, which is how old my dad would be this year had he lived longer. He made me my first (barbie) coathangers this very same way a long time ago.
Saturday, September 8, 2012
Beach Outfit, finished
Some of the pieces in this post appeared earlier, in the Creamsicle post.
The Resinsoul (aka Regina) is off to the beach, if she can only get the dog to cooperate.

The hat is a huge circle with an off-center hole chopped in it. I jazzed it up with green satin ribbon. From below and to the front it looks kind of Edwardian, but this view shows its early 1950s New Look genes.

The brim has only one circle of millinery wire. It needed two but the green ribbon I had on hand was too narrow for two rows of wire. So it is a bit floppy.
The camisole top and shorts were already done, they just needed nifty buttons.


The tote, along with the hat, is new.

The dog is in the bag! Time to go.

Friday, September 7, 2012
Obitsu Dog, finished for now
I finished (more or less) adding a fur suit to my brown Obitsu dog.
 I am trying to believe he is a lap dog
 I covered his body, then cut holes out where the legs insert, then stuck the legs on.


If I decide to add more fur, I will cover each leg individually, leaving a big flap at the top (I won't cover the foot or foot joint). Then I'll stick the leg back in the body, and stitch the flap down around the joint. Hopefully leaving enough slack for mobility.
My original clear Obitsu is quite floppy (he came pre-assembled) but the brown one I put together from a kit (so he is a hybrid A/B) is quite stiff. He holds poses better. The fur suit does not interfere with posing as a dog would.


 I am trying to believe he is a lap dog
  I covered his body, then cut holes out where the legs insert, then stuck the legs on.

If I decide to add more fur, I will cover each leg individually, leaving a big flap at the top (I won't cover the foot or foot joint). Then I'll stick the leg back in the body, and stitch the flap down around the joint. Hopefully leaving enough slack for mobility.
My original clear Obitsu is quite floppy (he came pre-assembled) but the brown one I put together from a kit (so he is a hybrid A/B) is quite stiff. He holds poses better. The fur suit does not interfere with posing as a dog would.


Thursday, September 6, 2012
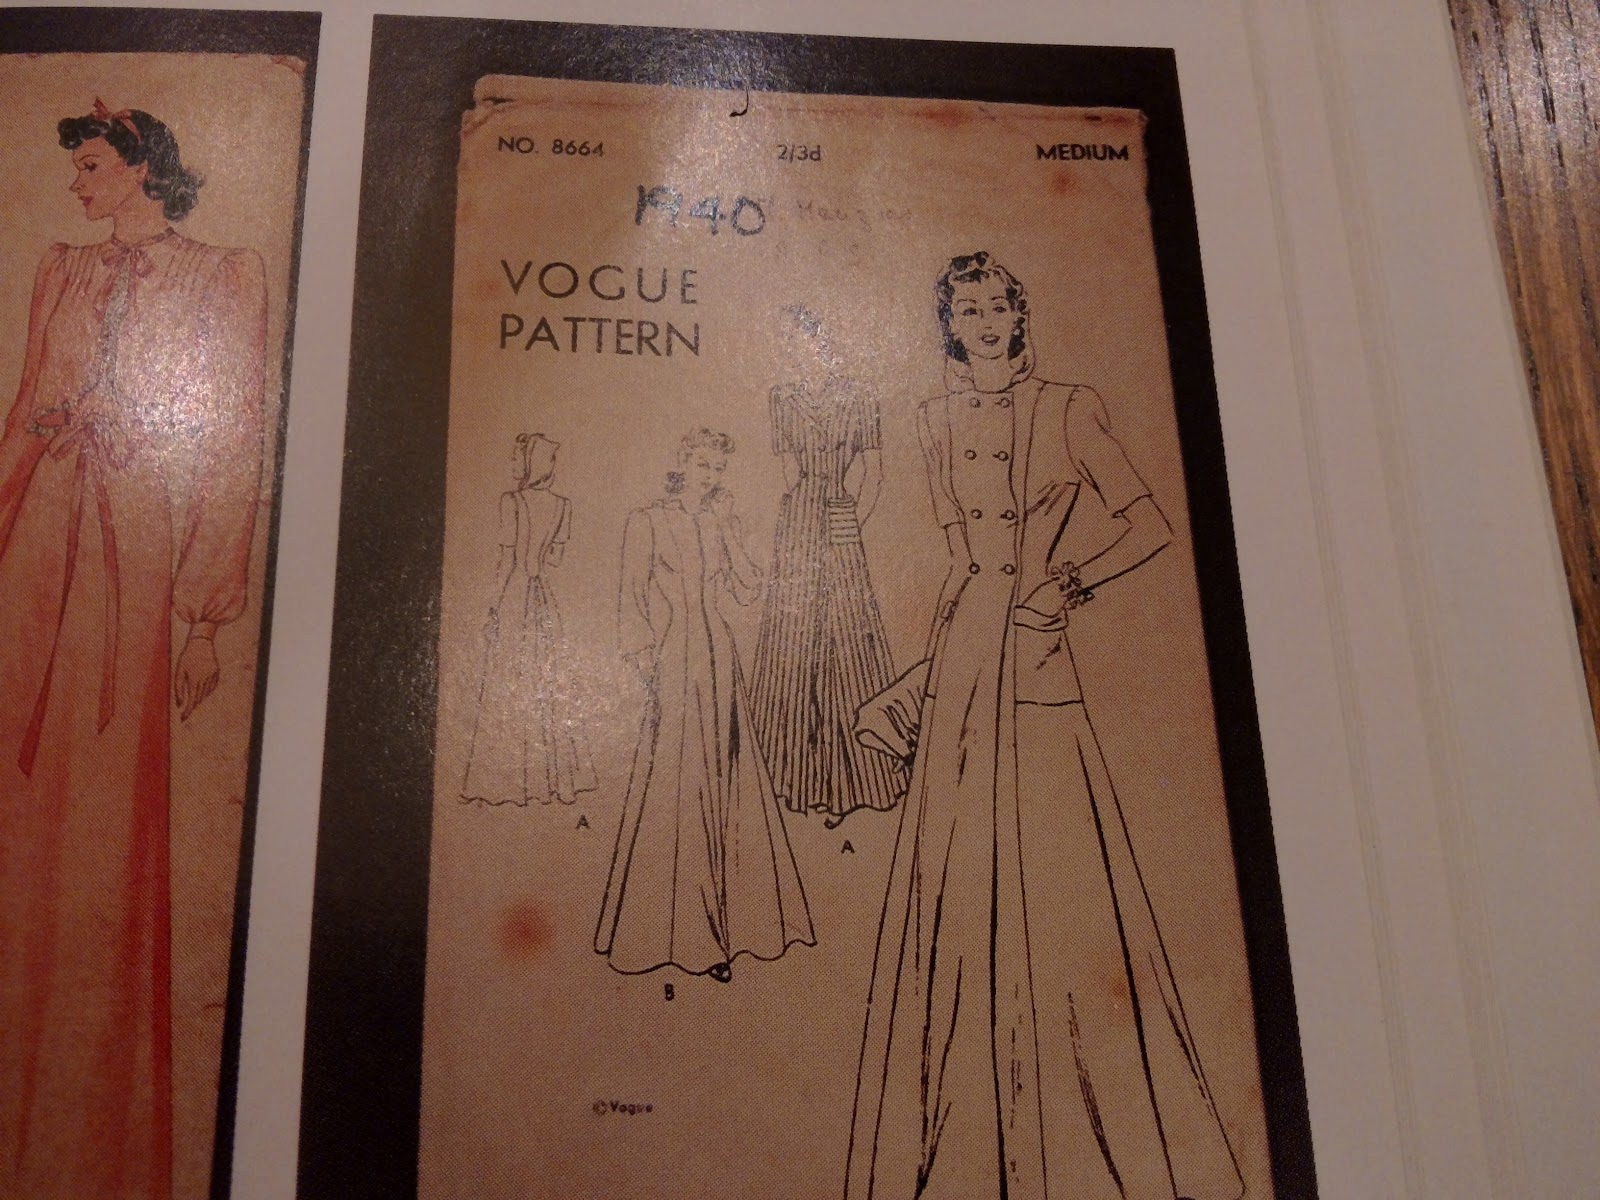
1940 Dressing Gown
I've finished a nightgown and hooded dressing gown for the Resinsoul doll.
The nightgown is from a early 1940s slip patent image I found on Google Patent search.
The Resinsoul's shoulders are quite narrow and the straps slip off. The gown also fits the Impldoll and her shoulders are wider so the straps stay put.

The observant among you will notice my Resinsoul doll has a foreign head now. I had an extra Impldoll head and decided I like it much better. However, the resin is quite a bit darker and I'll have to do some serious body blushing to make it match. For now consider that Regina (the Resinsoul) has gotten into her sister's makeup.

I drafted the dressing gown pattern myself, based on a modified princess seamed pattern from Perfect Patterns. This fits the Resinsoul doll better than the Impldoll since the Impldoll has more hip.

Both the nightgown and the dressing gown are made in yellow cotton voile, unlined, and trimmed with narrow blue polyester ribbon. The seams are mostly topstitched and then trimmed close to the stitching.
The hood is not big enough. So it will just hang down the back.

The sash is a single layer of voile, edge turned under and ribbon stitched down.

I had originally intended to close the gown with a double row of light blue buttons, like the original, but I did not use interfacing on the facings and I'm not sure the buttonholes will come out as neatly as I'd like.
At least I know the dressing gown fits well enough that I could do a double breasted closure if I wanted to.

Here is a very bad picture of my inspiration for the dressing gown, from Blueprints of Fashion.
Subscribe to:
Posts (Atom)